


Installation instructions
ADVICE SHEET FOR THE INSTALLATION OF YOUR WINDOWS AND DOORS.
Any information on this sheet is intended as a basic guide to installation. We cannot predict every type of installation that may be encountered. If you are unsure of any of the installation process then seek an installation expert to install for you.
Please read this sheet in full and check size, style and operation of your goods prior to commencing or arranging an installation.
IMPORTANT- MUST BE READ
All windows and doors are checked before they leave the factory. However, please check your goods to ensure they are the correct size and style, and operate easily. To ensure a proper test on side hinged openers, including doors, lay the frame flat horizontally to test operation. If you are unhappy with any part of an item supplied do not begin the installation! Contact our customer services department. In the event that there is an error then we will either send you a replacement part/ item or arrange to collect the item, correct as necessary and return the goods to you.
STANDARD INSTRUCTIONS
1. Preparation
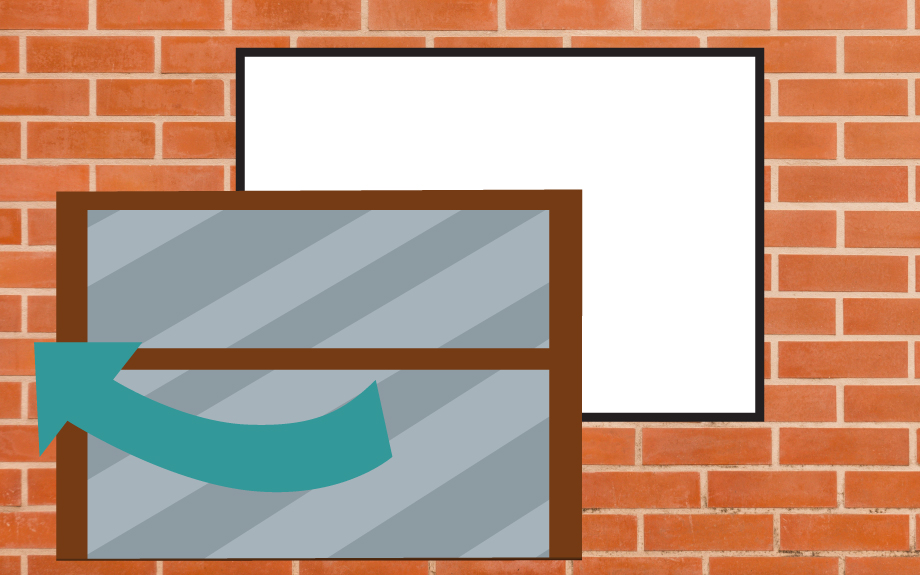
When you are happy with the goods supplied, you may begin to remove the old window or door If you are fitting various sizes of window, we suggest you start with the smallest window first and complete the installation process before moving onto the next. Firstly, remove the glass from the old frame. When the aperture is completely clear and clean of the old frame and removed from the working area, ensure that the opening allows for a square installation with a minimum of 4mm all round the frame. Remove the protective film prior to installation.
When you are happy with the goods supplied, you may begin to remove the old window or door If you are fitting various sizes of window, we suggest you start with the smallest window first and complete the installation process before moving onto the next. Firstly, remove the glass from the old frame. When the aperture is completely clear and clean of the old frame and removed from the working area, ensure that the opening allows for a square installation with a minimum of 4mm all round the frame. Remove the protective film prior to installation.
2. Cill
If a cill is to be used, mark and cut for horns. After the horns are cut, screw the cill to the bottom of the frame. Do not over-tighten. Screws are not provided.
If a cill is to be used, mark and cut for horns. After the horns are cut, screw the cill to the bottom of the frame. Do not over-tighten. Screws are not provided.
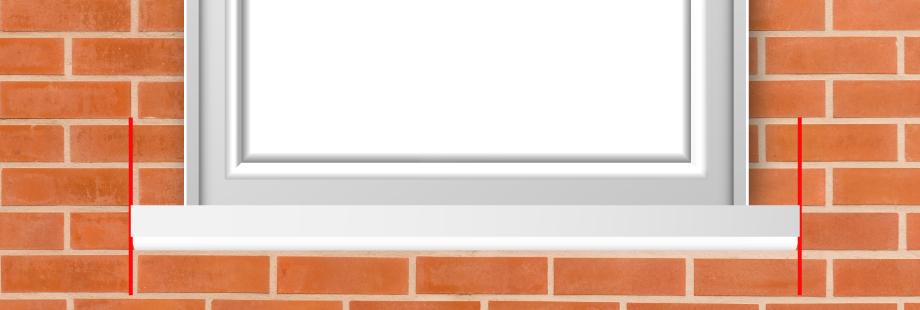
3. Fixing
Offer the frame to the opening, ensuring the cill is level and fully supported underneath, that the sides are plumb and vertical and that the top and bottom of the frame are level. To fix the frame, ensure the correct sleeved fixing bolts are used (not supplied). Fixing bolts should start 150mm from the corners of the frame and a minimum of 400mm there after. Ensure that the diagonals are equal on completion of installation. Silicone should be used to seal the outside of the frame and Acrylic on the inside. Caution should be taken not to over-tighten the fixing bolts as this will create an outward bowing effect and will affect the operation of the frame.
Offer the frame to the opening, ensuring the cill is level and fully supported underneath, that the sides are plumb and vertical and that the top and bottom of the frame are level. To fix the frame, ensure the correct sleeved fixing bolts are used (not supplied). Fixing bolts should start 150mm from the corners of the frame and a minimum of 400mm there after. Ensure that the diagonals are equal on completion of installation. Silicone should be used to seal the outside of the frame and Acrylic on the inside. Caution should be taken not to over-tighten the fixing bolts as this will create an outward bowing effect and will affect the operation of the frame.
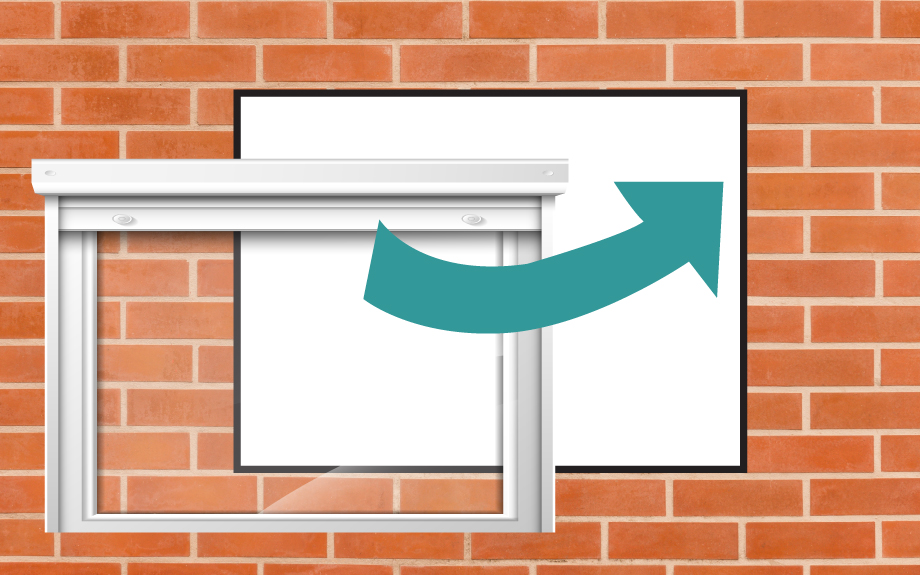
4. Fitting the sealed units
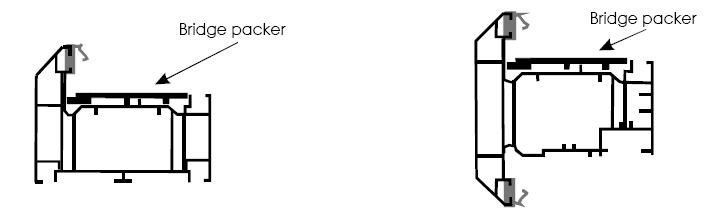
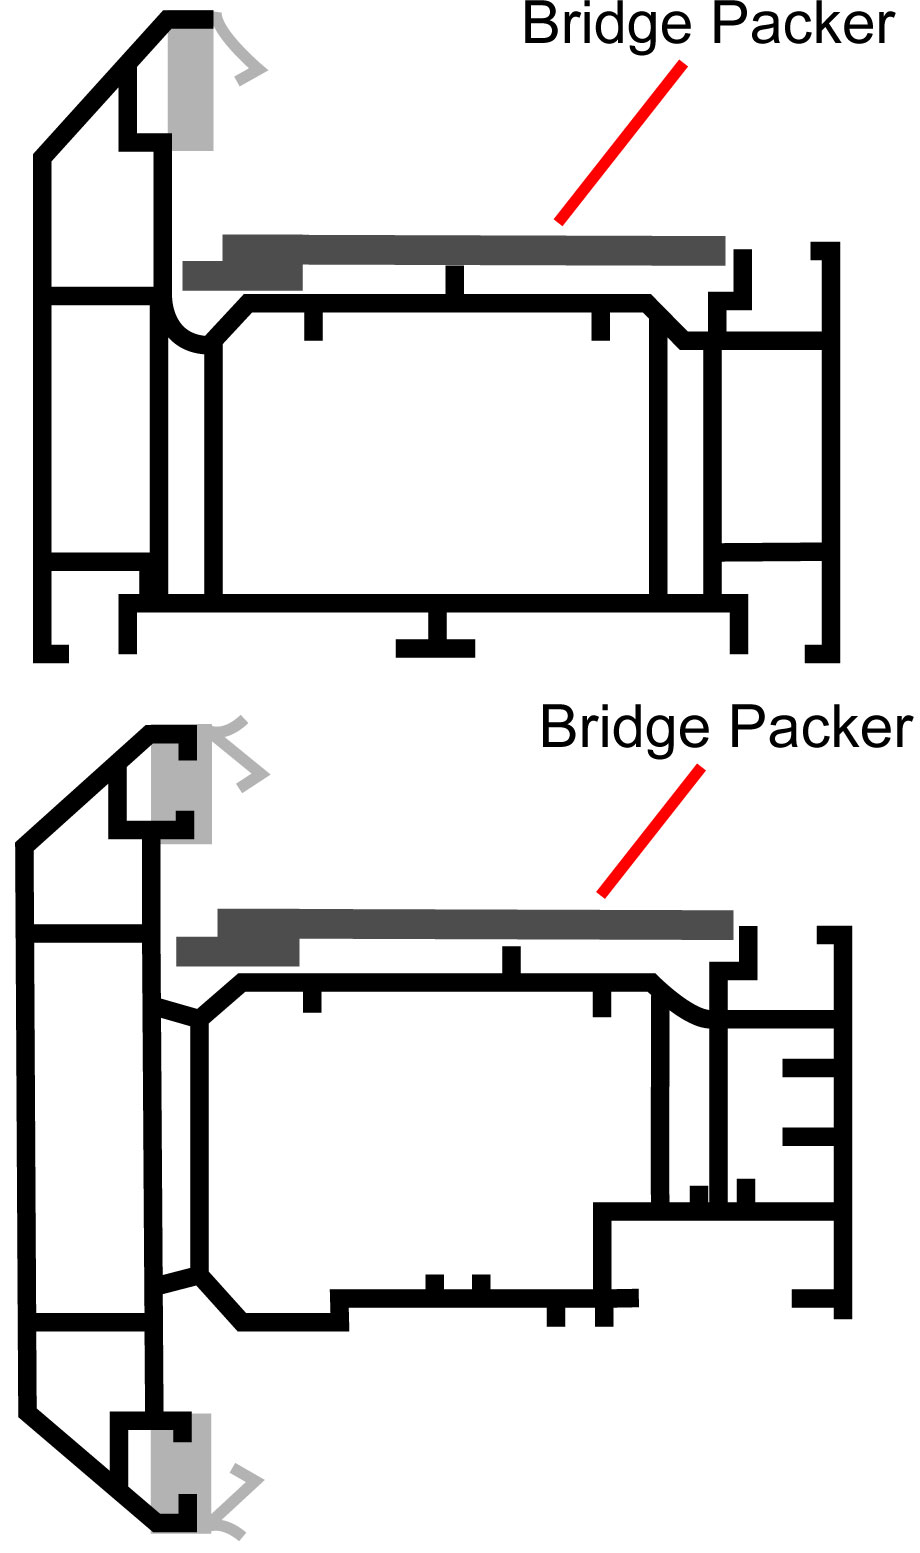
Remove the plastic beading from the frame one by one and mark on the inside "top", "bottom", "left" and "right" accordingly with a pencil to allow for correct reinstallation. lace the bridge packers on the frame (indicated below) so that the packer lies flat and parallel to the frame, with the channel side towards he frame and the ridge side facing upwards to allow for correct drainage. The black packer and green packers fill any remaining gap between the sealed unit and bridge packer to ensure a tight fit. Place the sealed unit into the aperture and pack according to the type of opening or item.
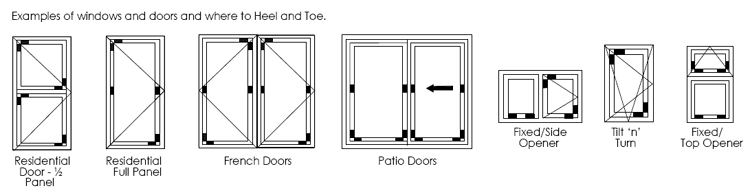
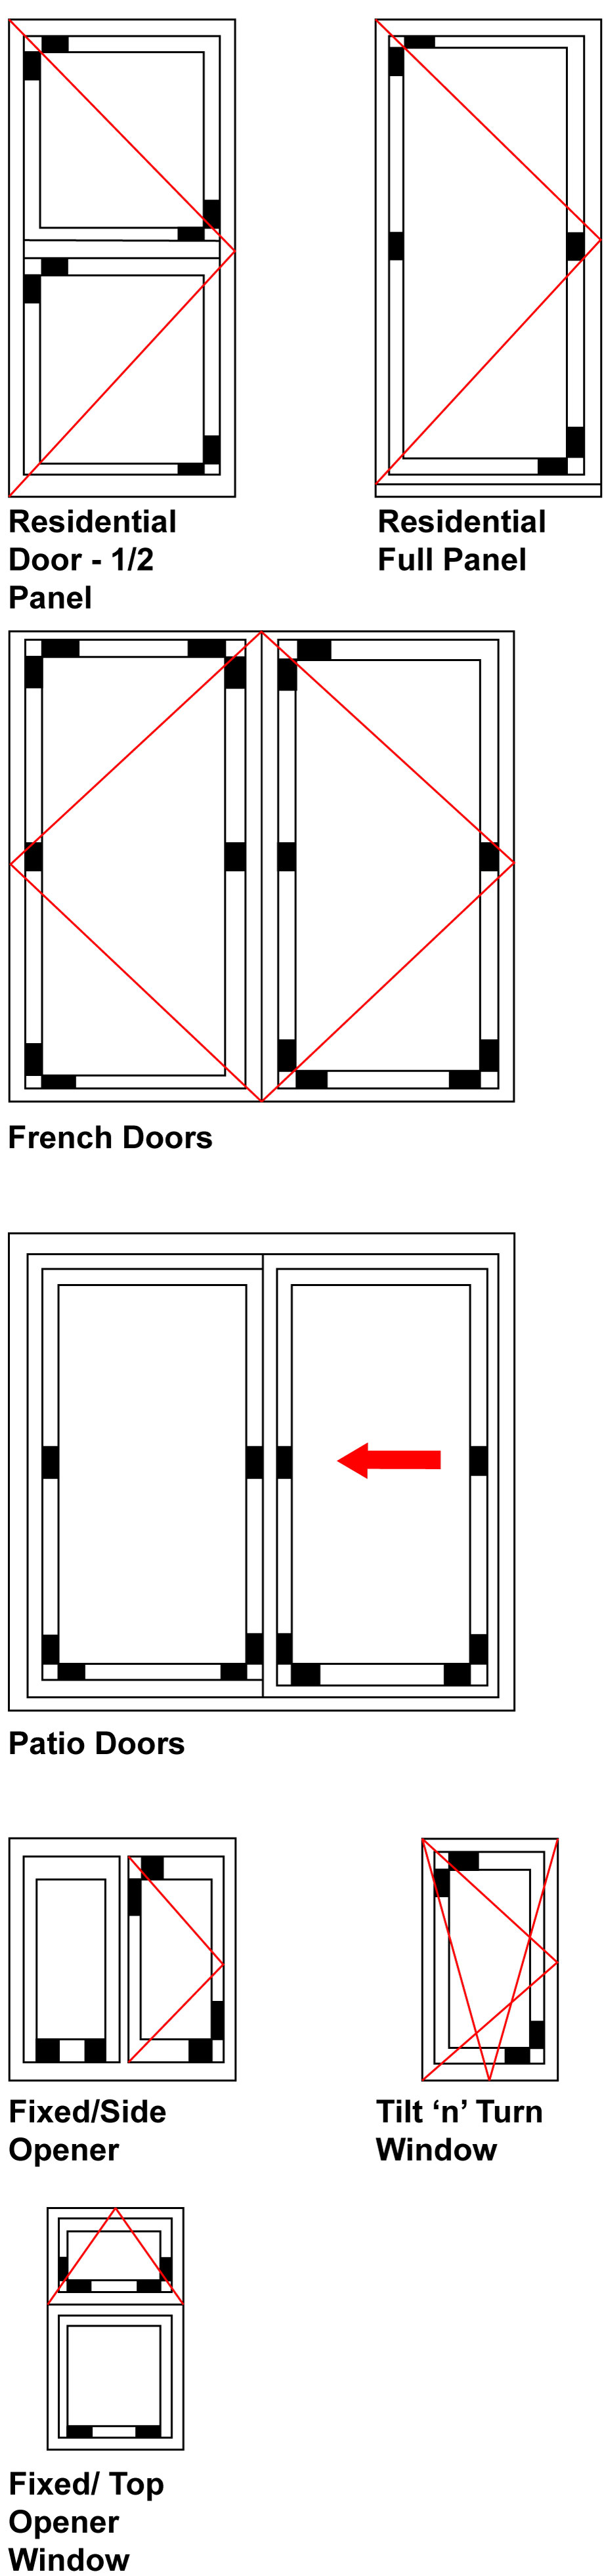
Heel and Toe
Side Openings and doors- Place black bridge packers from Diagram1 in lower hinged corner and in the upper floating corner (diagonally across) to ensure the unit is correctly heel and toed. Fit shims (green packers) to ensure a tight fit. If you run out of shims, these can be cut in half to spread them further. Diagram1 Bridge packers are used only against the frame, while Diagram2 bridge packers can be placed on top of the other bridge packers. Shims are to be used next to sealed units only. For doors and French doors without mid rails, pack the centre of the sealed unit also for easy operation and security.Top Openings and Patio doors - It is paramount that these sashes are correctly packed at the sides and bottom. Fixed units - Require a set of packers under the sealed units only. Please note: The Heel and Toeing of windows is the same for internally or externally beaded windows.
5. Checking
Make sure all openers work and have been correctly packed. Should an opener not work, then it is likely that it has been incorrectly packed. The unit must be removed, re-packed and reinstalled. Failure to do this can result in locks not engaging properly, daylight being seen, a lack of weather protection and possible grating on locks or on the bottom of the sash when closing. If you find you have any of these problems, to rectify, check :-
- Your installed item is square in the house aperture and is not twisted in any way.
- That its diagonal measurements are equal, both with the frame and any sashes.
- That the frame has not been stretched by over-tightening the fixing bolts (especially in a door.)
- If minor (mm) adjustments are required after heel and toeing, all our hinges have minor adjustment capabilities.
- All our windows and doors have adjustable cams located on the locking strips. Using an Allen key, these can bring the window or door sash tighter or less tight to the frame.
- The small latch plate to the locking mechanism of the door is adjustable by using a Phillips screwdriver and rotating each screw half a turn to loosen the plate. Reposition, then tighten screws.
- Hook bolt latch plates are adjustable by rotating the cams using an Allen Key. Move inwards to tighten the door to the frame to give maximum security. Patio doors have adjustable wheels for upward and downward movement. Take a small Phillips screwdriver and adjust the wheels at the base of the sliding door between track and door.
- Having carried out these checks and you require minor adjustments, please contact our Customer Services department with your invoice number ready to discuss your requirements
SPECIALIST INSTRUCTIONS
Patio doors
When installing the fixed side of the patio door, carefully remove the large trim at the side of the door on the outside of the frame with a large sharp chisel. Drill and bolt behind it, then replace the trim. Please note that the stopper for the door is located to the external side of the door upon installation, and that the glazing bead is on the inside/room side of the sash(es).
LOOKING AFTER YOUR INVESTMENT IN PVCu WINDOWS AND DOORS
LOOKING AFTER YOUR INVESTMENT IN PVCu WINDOWS AND DOORS
Following these recommendations will assist in keeping your units looking fresh and maintaining their working efficiency for years to come.
1. Cleaning PVCu frames and sashes - Never use anything abrasive as this will scratch the surface and trap dirt. Wash frames with a mild solution of washing up liquid and water. With stubborn marks, lightly rub with a non-abrasive cream cleaner.
2. Glass - Any proprietary glass cleaner is suitable.
3. Locks and Hinges - Spray WD40 into all locks and onto any metal to metal surfaces around your doors and windows twice a year, wiping away any excess.
4. Doors and windows - To ensure a draught free unit, keep the door in a locked position when closed. This will achieve a tight seal on the gaskets. If required, most of our locking systems are adjustable (See Checking).
5. Friction Stays - Treat as with Locks and Hinges. There is a pressure plate that is adjustable by a slot head screw to allow you to adjust the friction of your sash operation. NEVER over-tighten this as it will affect the smooth operation of the sash.
6. Drainage - After heavy rainfall you may find water lying in the bottom of your window or door frame. This is no cause for concern as it will drain away through the holes in the base. Check twice a year that these holes have not become blocked. If found to be so, clean out and check they are clear by pouring a small amount of water through them.
7. Lead work - As new lead work is exposed to rain an oxidation process will develop a white or mottled staining on the lead. As this process is completed (usually within a few months), the lead shall become dark grey in colour and no longer stain. To clean away the "bloom", wipe with a damp cloth.
THANK YOU FOR PURCHASING FROM DUNSTER HOUSE LTD. WE VALUE YOUR CUSTOM, AND LOOK FORWARD TO A LASTING BUSINESS RELATIONSHIP WITH YOU.
WELCOME TO DIY uPVC WINDOWS AND DOORS

Our on-line design tool uses a simple step-by-step process to produce an instant quote for the uPVC windows and doors you want, in just a few minutes. You won't find the same quality product, level of service or price to match - If you do we promise to beat it*.
* See our Price Promise


© Dunster House 2024
Dunster House | Factory 1 | Caxton Road | Elms Farm Industrial Estate | Bedford | Bedfordshire | England |MK41 0LF
